JAVA/Spring
Spring - @Autowired와 @Qualifier의 차이점과 @Autowired의 바인딩 방법
realizers
2021. 10. 30. 13:36
728x90
반응형
아래의 코드는 @Autowired와 @Qualifier 어노테이션의 차이점을 알아보기 위한 코드입니다.
Exam Interface
public interface Exam {
    int total();
    double avg();
}
KDGExam Class
public class KDGExam implements Exam{

    private int kor;
    private int eng;
    private int math;

    ... 세터들 존재한다는 가정

    @Override
    public int total(){
    	return kor + eng + math;
    }

    @Override
    public double avg(){
    	return total() / 3;
    }
}
ExamPrint Class
public class ExamPrint {

    private Exam exam;

    public void setExam(Exam exam){
    	this.exam = exam;
    }

    public void print(){
    	System.out.println("total : " + exam.total() + " avg : " + exam.avg());
    }
}
setting.xml
<bean id="exam" class="example.KDGExam">
    <property name="kor" value="50" />
    <property name="eng" value="60" />
    <property name="math" value="70" />
</bean>

<bean id="print" class="example.ExamPrint" >
	<property name="exam" ref="exam" />
</bean>
테스트 코드
public class Main {
	public static void main(String[] args){
    	ApplicationContext context = new ClassPathXmlApplicationContext("spring/study/setting.xml");

        ExamPrint print = context.getBean(ExamPrint.class);

        print.print(); // total값과 avg값 출력
    }
}
@Autowired 어노테이션 사용
위의 코드는 @Autowired 어노테이션을 사용하지 않은 코드입니다.
아래 예제에서는 setting.xml에서 print 빈의 property 요소를 제거한 다음 해당 속성을 @Autowired 어노테이션을 사용하여 DI를 하는 방법을 보겠습니다.
setting.xml
<context:annotation-config /> 추가
<bean id="exam" class="example.KDGExam">
<property name="kor" value="50" />
<property name="eng" value="60" />
<property name="math" value="70" />
</bean>
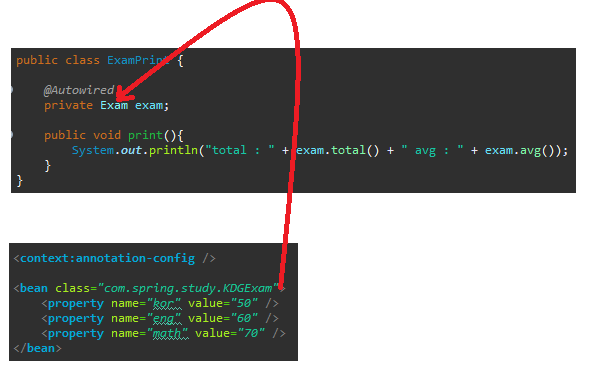
<bean id="print" class="example.ExamPrint" />ExamPrint Class
public class ExamPrint {

    @Autowired
    private Exam exam;

    public void print(){
    	System.out.println("total : " + exam.total() + " avg : " + exam.avg());
    }
}
근데 어떻게 @Autowired 어노테이션을 사용하면 자동으로 바인딩이 될까?
- 첫번째 자료형을 기준으로 찾는다.
- 사실 빈 속성 중 id값이 없더라도 Class 타입으로 찾을 수 있습니다.
- Exam은 인터페이스지만 KDGExam은 Exam 인터페이스를 구현한 클래스이므로 스프링 컨테이너가 Exam이 참조할 수 있는 객체인 KDGExam을 자동으로 찾아서 바인딩을 해줍니다.
- 두번째 변수명을 기준으로 찾는다.
- 변수명으로 찾을 경우 @Qualifier 어노테이션을 사용합니다.
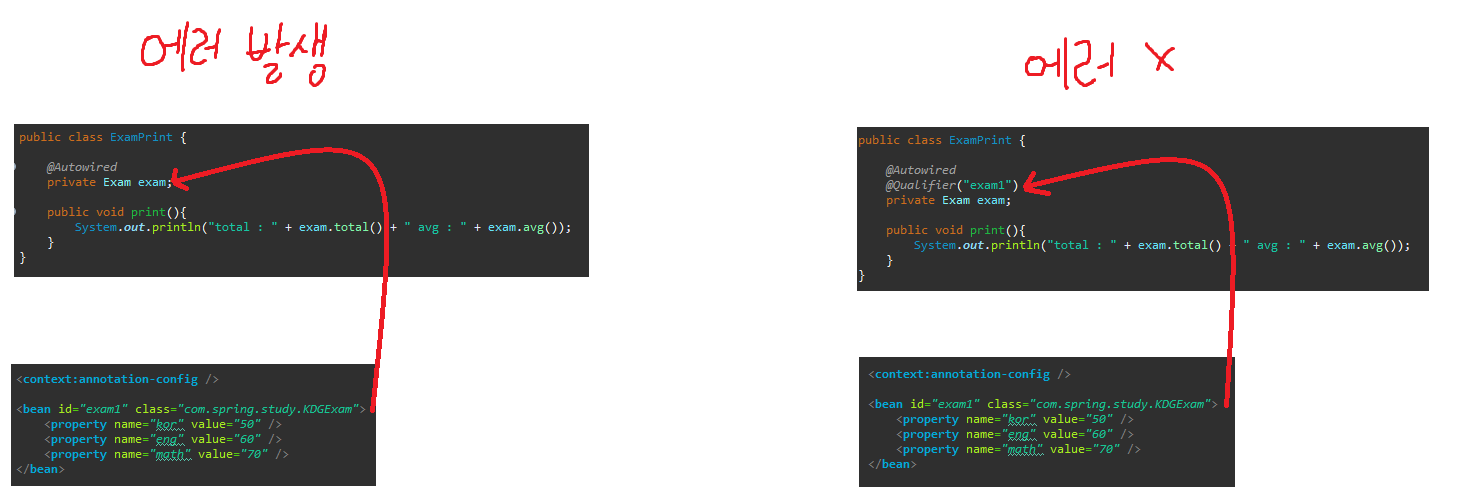
@Qualifier 어노테이션 사용
setting.xml에는 exam1 빈과 exam2 빈이 각각 있습니다. 이때 ExamPrint 클래스에서 두 개의 빈중 하나의 빈을 선택하는 방법을 알아보겠습니다.
setting.xml
<bean id="exam1" class="com.spring.study.KDGExam">
	<property name="kor" value="50" />
	<property name="eng" value="60" />
	<property name="math" value="70" />
</bean>

<bean id="exam2" class="com.spring.study.KDGExam">
	<property name="kor" value="70" />
	<property name="eng" value="80" />
	<property name="math" value="90" />
</bean>


<bean id="print" class="com.spring.study.ExamPrint" />
ExamPrint Class
public class ExamPrint {

	@Autowired
	@Qualifier("exam2")
	private Exam exam;

	public void print(){
    	System.out.println("total : " + exam.total() + " avg : " + exam.avg());
    }
}
728x90
반응형